


What is a Season in flight simulator?
A Season in flight simulator is the way you can see vegetation and ground surface. They are different from calendar Seasons that start and end on specific dates. In all of this document when we talk about a Season, it is flight simulator Season and it is not calendar Season.
There are 5 different Seasons in flight simulator:
- Spring
- Summer
- Fall
- Winter
- Hard Winter(Snowy)
Why do flight simulator default Seasons need to be improved?
By default, there are fixed Season definitions in flight simulator and in many cases they are not match the real world because start and end of a Season is different (earlier or later) from last year in the real world.
In flight simulator Seasons only can be changed at the first day of each month! It means if you fly on March, 31st it can be hard winter (ground covered by snow) and then next day on 1st of April you can see it is spring and there is no trace of Snow anywhere! It is not real at all.
That’s why it is needed that Seasons can be adjustable for better experience.
What is SimElite Solutions Season Manager?
SimElite Solutions Season Manager is a brand new, simple to use program introduced by SimElite Solutions and it allows users to adjust Season of their flight simulator environment in four different modes:
- LIVE mode: Set flight simulator Seasons to real world’s Seasons (Whole world).
- Historic mode: Set flight simulator Seasons to real world’s Seasons (Whole world) from specific day in the past.
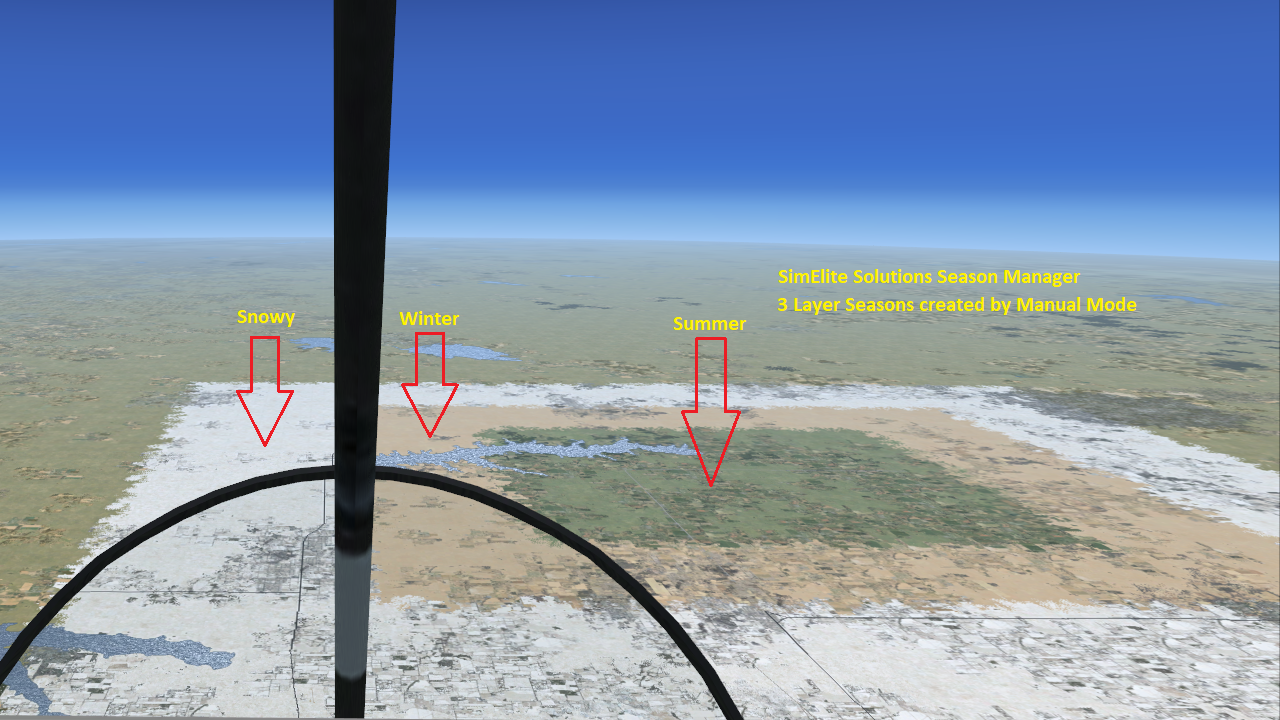
- Manual Mode: Set flight simulator Seasons locally based on customized Season created by user on Season Manager website.
- Public Manual Mode: Set flight simulator Season locally based on a customized Season created by other users on Season Manager website.
Season Manager contains two parts:
- A Windows application program runs on user’s flight simulator computer
- A website to create and manage customized Seasons
Season Manager is working with these flight simulators:
FSX, FSX STEAM, Prepar3D (V1 to V5).
A - How to use Season Manager program?
For using Season Manager program, please follow these steps:
- Season Manger program must be run only on flight simulator computer and it can’t be run on other local network computers.
- Extract the package and copy “Season Manager” folder to your flight simulator computer (wherever you like) and make a shortcut of ‘Season Manager.exe” on your desktop.
- If Dot Net Framework 4.5.2 isn’t installed on your windows (Windows 10 has this version and you don’t need to install that), go to “dot net 4.5.2 installer” folder and install Microsoft’s “NDP452-KB2901954-Web.exe” first.
- If Visual C++ libraries isn’t installed on your Windows, go to “vc_redist” folder and install appropriate version of C++ libraries on your Windows. For 64bit Windows, install vc_redist.x64.exe and for 32bit Windows install vc_redist.x86.exe.
- Run “Season Manager.exe”
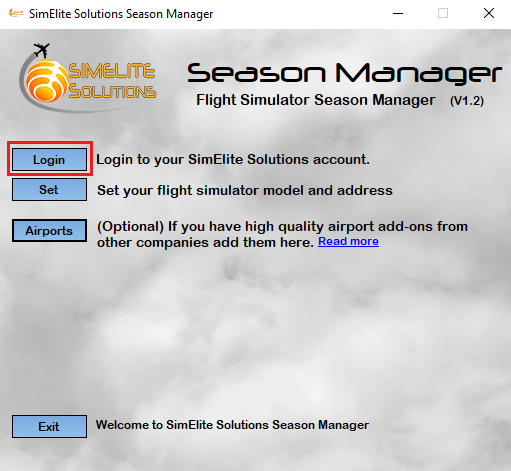
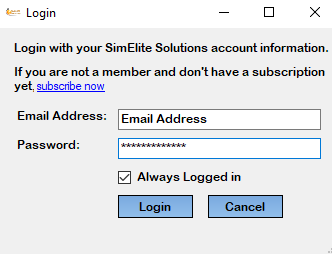
- After Season Manager program is opened, click on “Login” button.
- You need a SimElite Solutions account and active subscription to use Season Manager. Use your SimElite Solutions account login information to login. If you need to create an account or renew your subscription, you can use “subscribe now” link. If you check “Always logged in” checkbox it won’t be needed to login the next time you run this program.
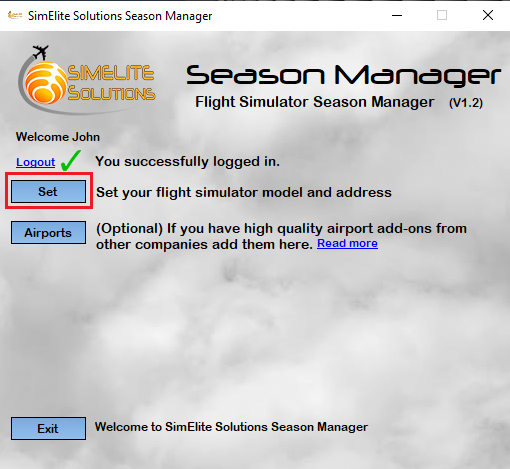
- After login your name will be shown on welcome message. Now you have to set your flight simulator address. Click on “Set” button:
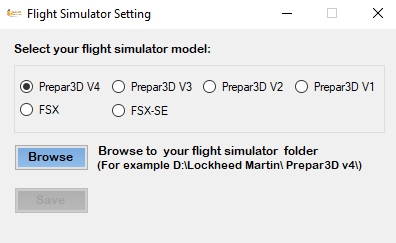
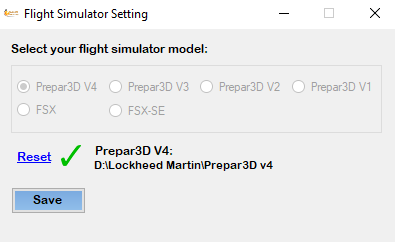
- On this page first select your flight simulator model and then click on Browse button
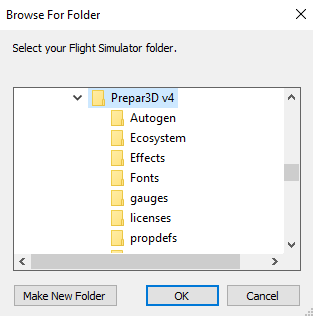
- Browse to your flight simulator folder and then click on OK button.
- If you select correct flight simulator folder, it shows you model and address. Click on Save button to save this setting.
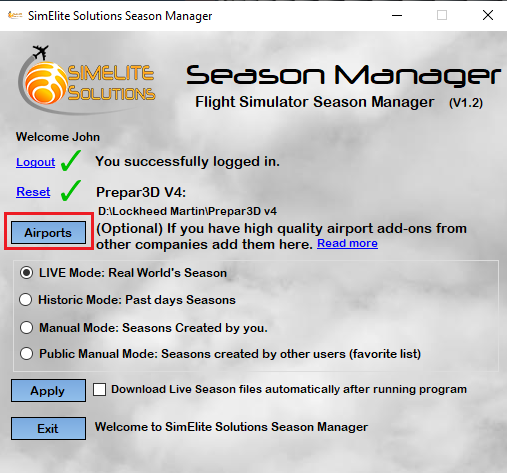
- 12- There is an optional Airports section that you can set it if you like. If you have high quality airport add-ons from other companies, it is better to add them here in Fall and Winter.
Some Photoreal high quality add-ons from other companies have their own season definitions inside them and changing flight simulator's standard season layer can't override them. The problem emerges in Fall and Winter when they have wrong Snow coverage for 3- 4 months but there isn't any Snow in those airports in real world. Our Season Manager sets correct Season in surrounding areas of those airports and result will be a Snowy airport in the middle of not Snowy region and it is not good looking at all.
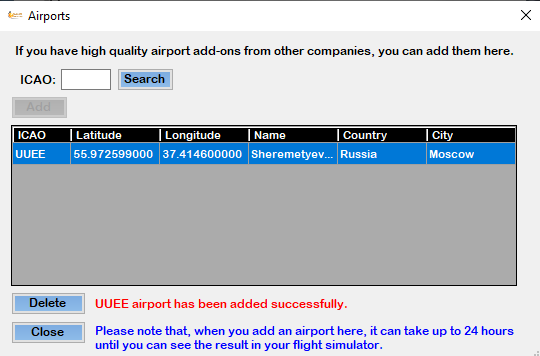
If you add those airports to Season Manager Airport list, it will add a transparent Season patch in surrounding areas of those airports and it means if you fly from/to those airports you can see a wider region with flight simulator's default Season around those airports and that strange looking of a single Snowy airport in the middle of not Snowy area will be fixed. - When you click on Airports button a new window will be shown. First you need to enter your desire airport ICAO code and then click on Search button to find it:
- Then you can click on Add button and that airport will be added to your airport list. As it is mentioned on that page, it can take up to 24 hours (next server update) until you can the result in your flight simulator. You can also Delete an airport from your list to do so first select the row and then click on Delete button.
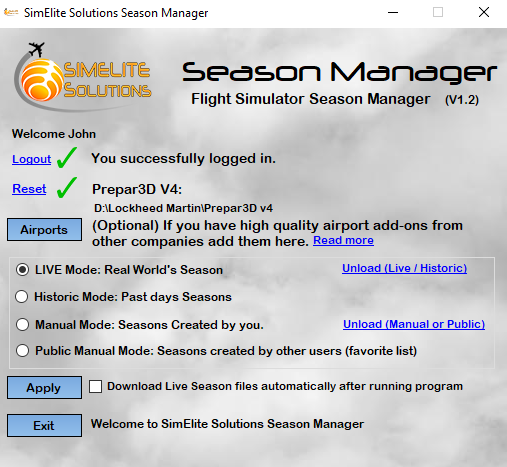
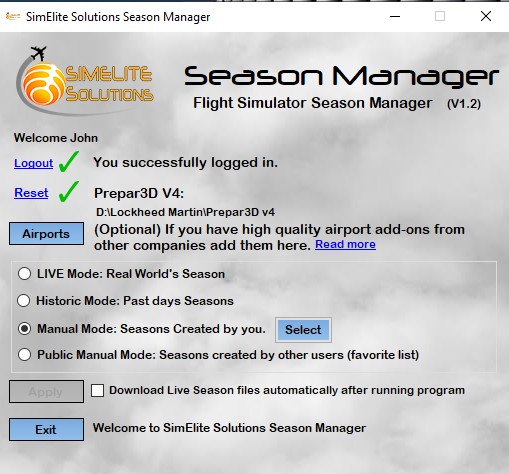
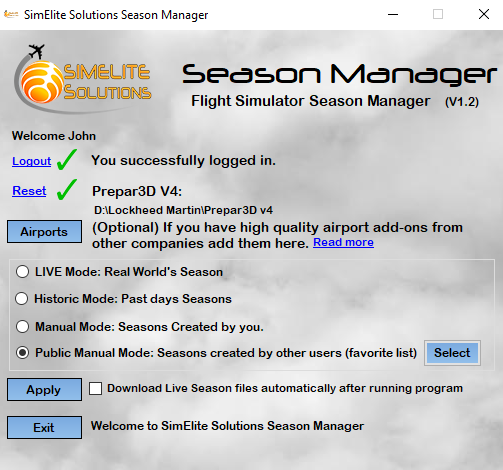
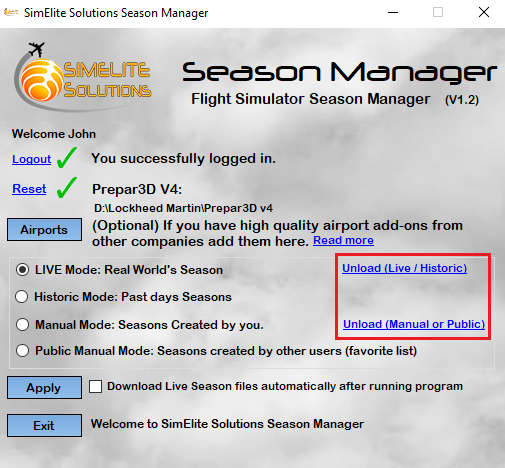
- 15- At this point you already set necessary settings and now you can select the mode you want to adjust your Season.
There are 4 modes:
- LIVE Mode
- Historic Mode
- Manual Mode: Seasons created by you.
- Public Manual Mode: Seasons created by other users (from your favorite list)
- LIVE Mode: If you use this mode, world’s current Season will be added to your flight simulator.
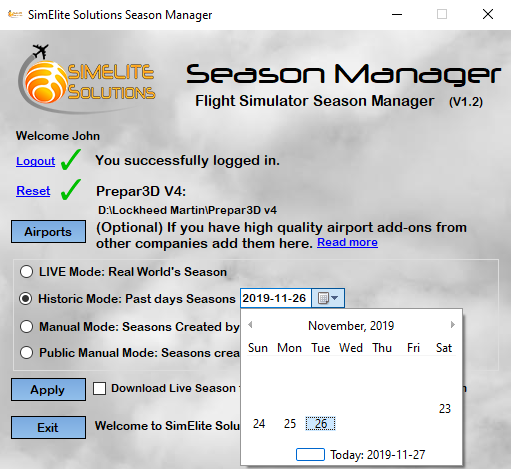
- Historic Mode: If you like to fly on a past date (for some schedule flights in virtual airlines) then you can set world’s Seasons of that date into your flight simulator. To do so just select Historic date and then select the date you want to fly.
Please note that historic data are available from 23rd November 2019. - Manual Mode: If you use Manual Mode, all your created Seasons on Season Manager website will be available to choose from. You can select only one Season and it will be added to your flight simulator. (for more detail on how to create a Season on Season Manager website go to Section B).
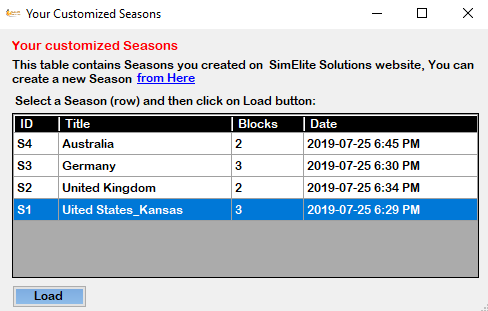
- When you click on “Select” button next window will be shown. You can see a table with all your created Seasons there. A Season id is a combination of letter “S” and a number like S1, S2,… It’s a unique value. You already defined a title for your Season and it helps you find the Season you are looking for. Number of blocks showing number of blocks a Season made with. Select a Season(row) and then click on “Load” button.
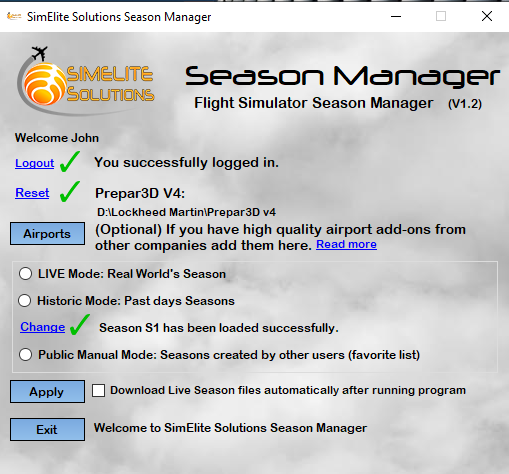
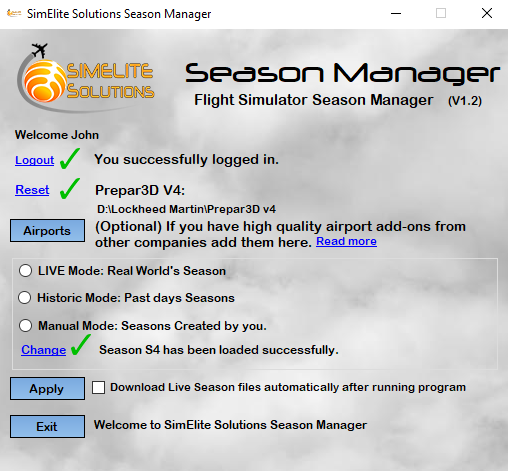
- After you load your Season, you can see it is loaded successfully.
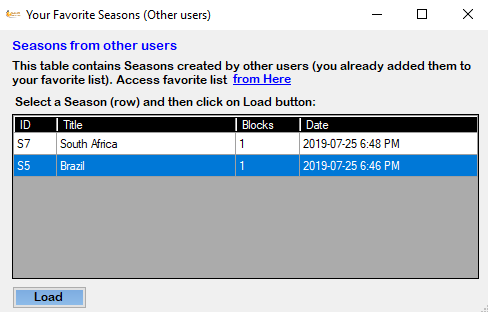
- Public Manual Mode: If you use Public Manual Mode, all Seasons created by other users on Season Manager website which you added them to your favorite list, will be available for you to choose from. You can select only one Season and it will be added to your flight simulator. (for more detail on how to add a Season created by other users to your favorite list on Season Manager website go to Section B).
- When you click on “Select” button next window will be shown. You can see a table with Seasons there. Select a Season(row) and then click on “Load” button.
- After you load your Season, you can see it is loaded successfully.
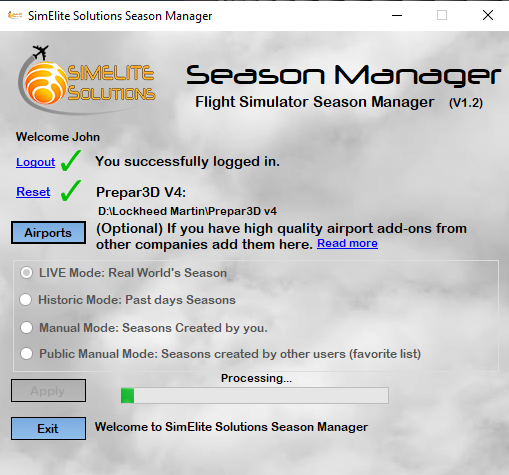
- 24- When you selected LIVE Mode, Historic Mode or loaded a Seasons from any of Manual Mode or Public Manual Mode, it’s time to click on “Apply” button to add your selected seasons to your flight simulator. Please note that your flight simulator must be closed when you apply your new season otherwise that Season won’t be applied until next flight simulator run.
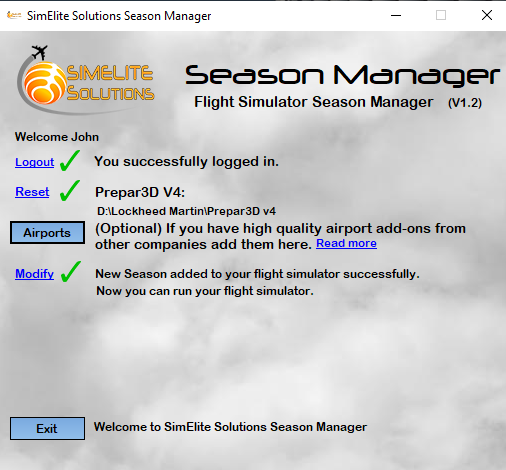
- At the end it shows you a message that everything is done successfully and now you can exit Season Manager program and run your flight simulator.
- If you want to set "both Live Mode(Or Historic Mode) and Manual Mode (Or Favorite Mode) seasons together, you can use “Modify” link on previous image to back to Season selection page and there you can load another type of Season. For example, if you want to set both Live Mode and Manual Mode Seasons then first load Live Mode and then click on Modify link and back to the Season selection page and then select your desire Manual Season. In this way both Live and Manual Season will be loaded to your flight simulator. When a Season type is loaded in your flight simulator and it is ready to run, you can see a link appears on Season Manager program, showing you the season is loaded and ready to use. You can click on Unload links to unload any Season types.
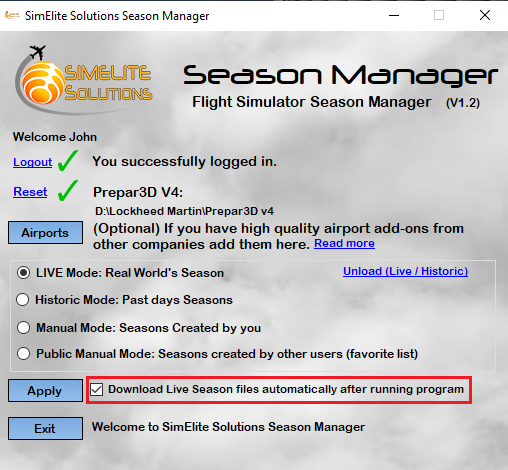
- If you check that “Download Live Season files automatically after running program” checkbox every time you run Season Manager program it automatically downloads Live Seasons from server and you don’t need to click on Apply button.
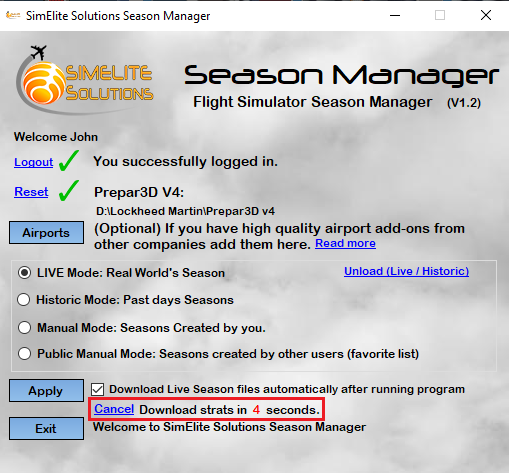
- When you run Season Manager program with “Download Live Season files automatically…” check box is checked you can see a countdown from 5 to 0 and then it starts downloading files from server. There is also a Cancel link on left side of counter and if you click on that, the process stops and you can manually do whatever you want like selecting Manual Mode…
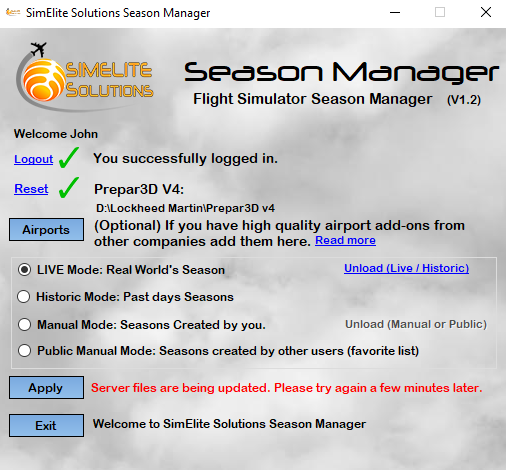
- You can’t download Season files while server files are being updated by system or admins. In this situation the program will show you a message and ask you to try again later. It usually takes 3 to 5 minutes so wait 5 minutes and then try again.

B – How to use Season Manager website?
You can create new customized Season definitions and manage your Season archive on Season Manager website. You need SimElite Solutions account to access this website.
Please follow these steps:
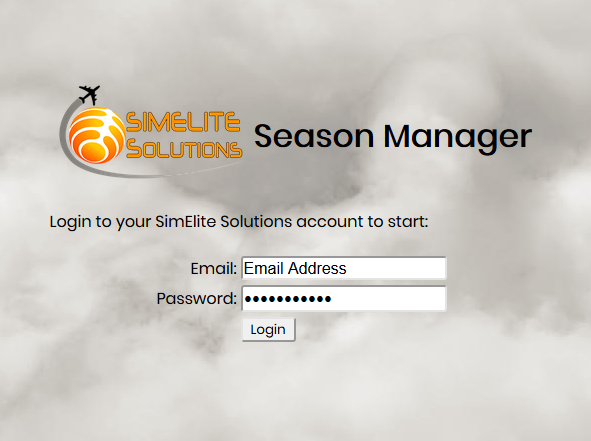
- Go to This address
- Enter your SimElite Solutions account login information to login.
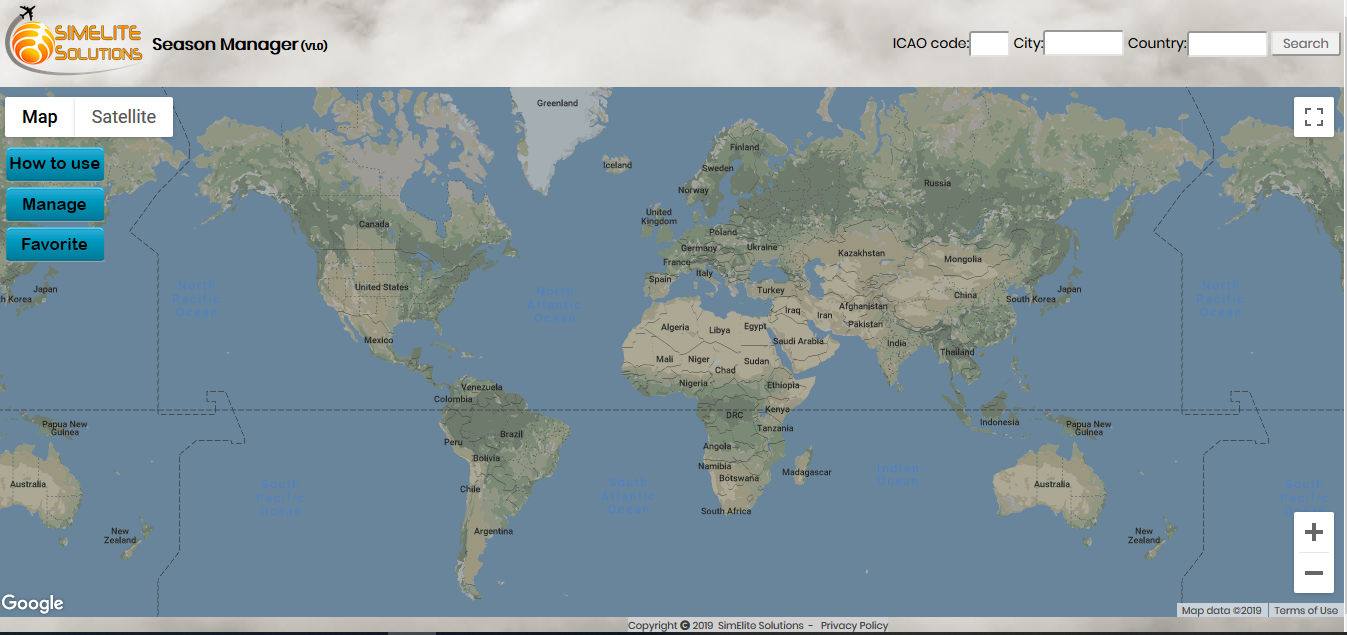
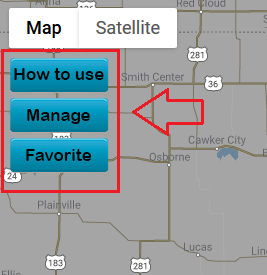
- You can see world map. There is a search section with ICAO, City and Country search boxes and there are 3 buttons at the left side:
- How to use
- Manage
- Favorite
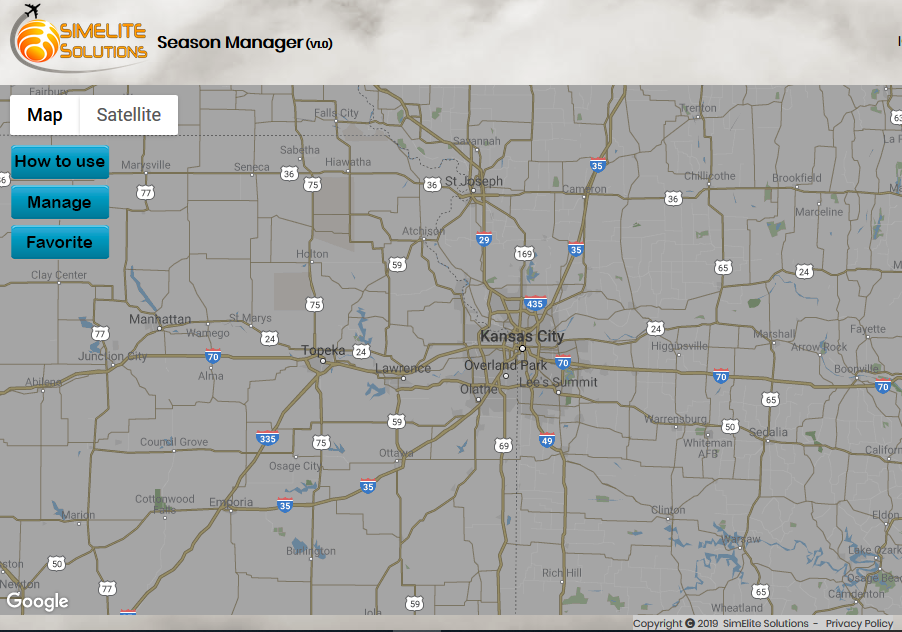
- First you have to find a place on the map (Country, City, Region…) that you want to create a manual Season for that region. You can do it by zooming and dragging the map. You can also use those search fields (ICAO, City and Country) for this purpose. For example, we want to create a manual Season for Kansas City in the United States so we zoom the map to Kansas City.
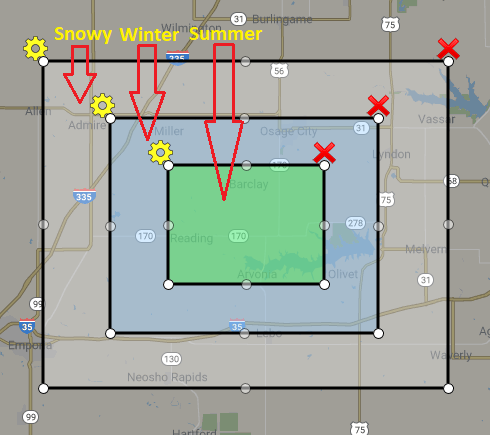
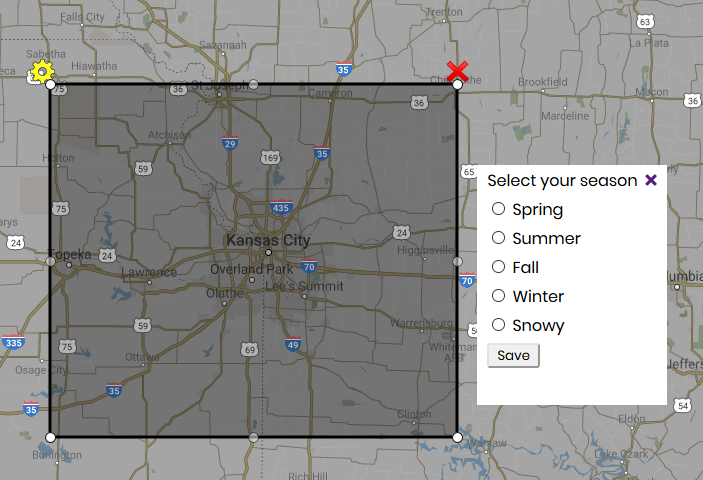
- Now if you click on the map, a gray rectangle and a white window will be appeared on the map.
The gray rectangle is a Season block and you can move it over the map to your desire point. There is a red cross button at top right which delete this block and also a yellow gear button at the top left which open setting window for this block. There are 8 small white circles on the edge of rectangle which you can use then to resize the rectangle.
There is also a white window beside that gray rectangle which you can use it to set desire Season for that block. You can move that white window with your mouse or finger on touch devices and place it wherever you like for easier operation. You can see 5 different Seasons on it (Spring, Summer, Fall, Winter and Snowy) and a Save button. If you click on any of those Seasons, color of rectangle (Season block) will be changed and you can visually see Season setting for that block.
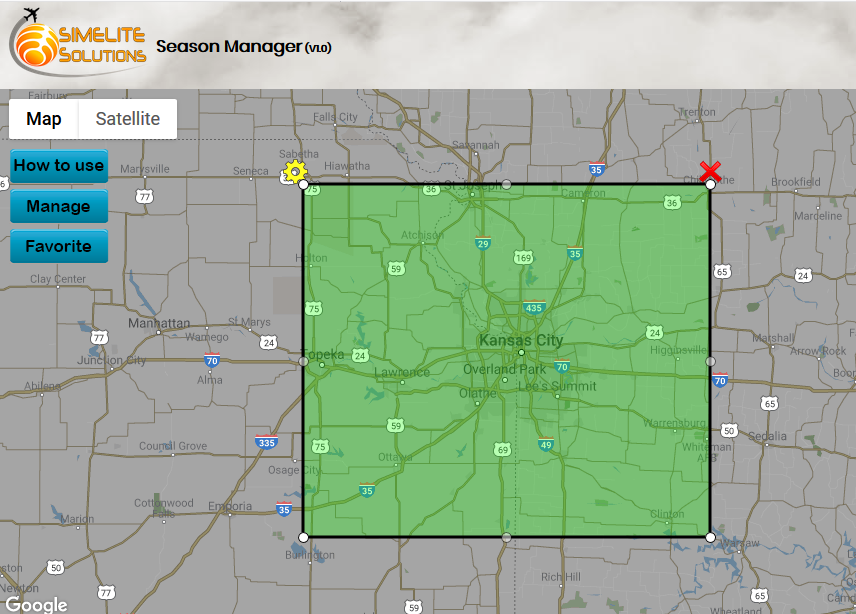
When you set desire Season for your block, click on Save button to save that block. - In this example we set Summer Season for this block and after save it will be look like this:
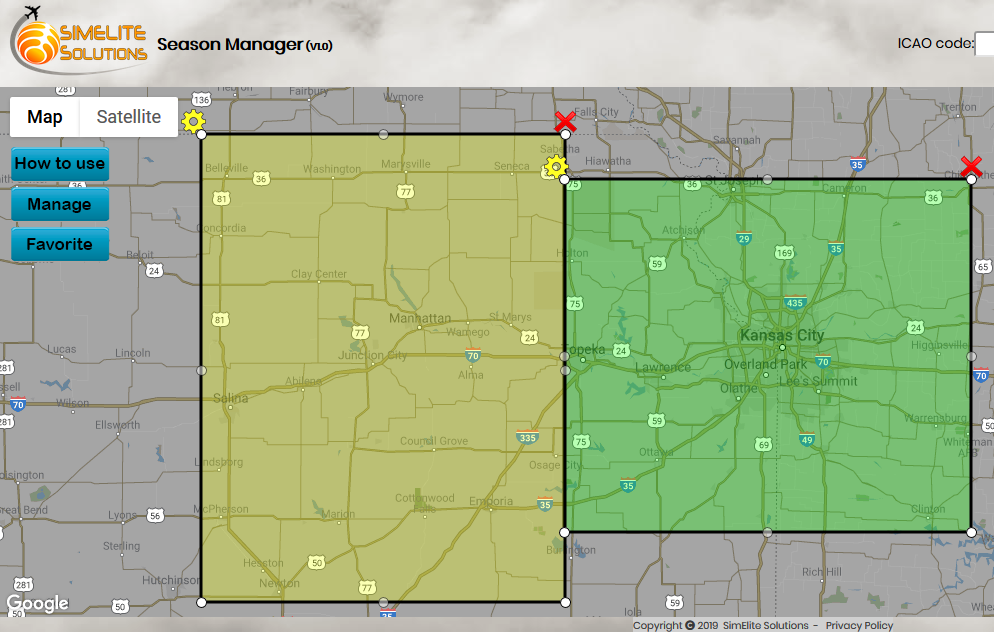
- Now if we want to create another Season block, we click on the map once again and another gray rectangle will be appeared and we can set the second one just like the first one.
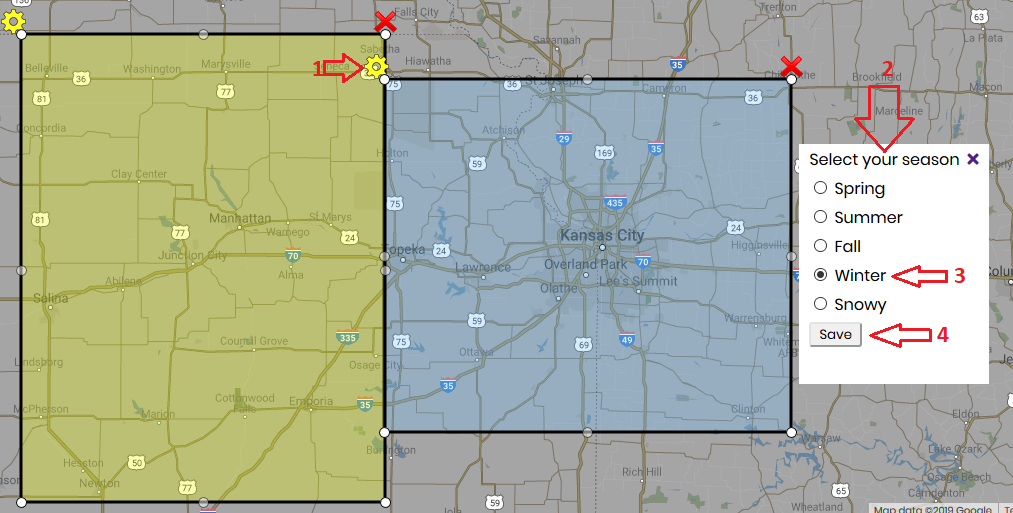
- You can also change each Season block size or location by moving or resizing it and all these changes will be saved automatically. You can also change each Season Block Season by clicking on Yellow gear at the top left and that White setting window will be appearing and you can change the Season by clicking another Season and at the end you need to save it using that save button.
In this example we change the first block’s Season from Summer to Winter - Now we show you what those three buttons on the map are doing.
- With “How to use” button you can read simple instructions about how to use this website like what you are reading on this document.
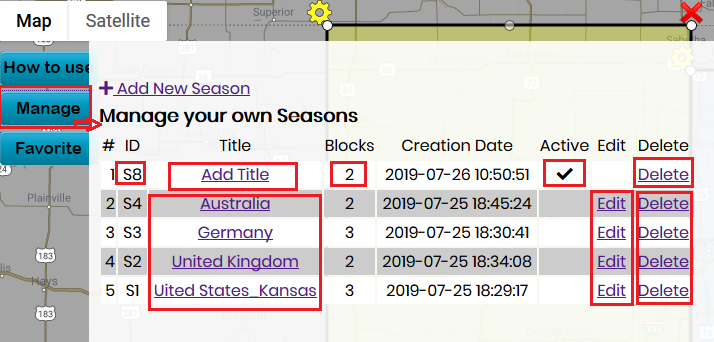
- With “Manage” button you can access your created Seasons and manage your old and current Seasons.
- Each row is a Season definition (Pack). Each Season definition pack can have 1 to N Season blocks.
- Each row has a Season ID (Starts with letter ‘S’ and a number) this ID is unique.
- There is a title for each row and after you created a Season definition pack just like we described on steps 5 to 8, you can add a title for your Season which can help you recognize your Season when you want to load it on your Season Manager Program or further alteration on this website. To add or edit a title click on “Add Title” or available title links and you will be able to define a new title for that.
- That Active checkmark is showing that you are currently working on that Season definition pack in this example S8 is active and those Season blocks we made on steps 5 to 8 are belong to S8.
- When you click on any “Edit” links, that Season definition pack will be loaded and you can add/edit/remove Season blocks for that Season.
- When you click on any “Delete” links, that Season definition pack will be deleted permanently.
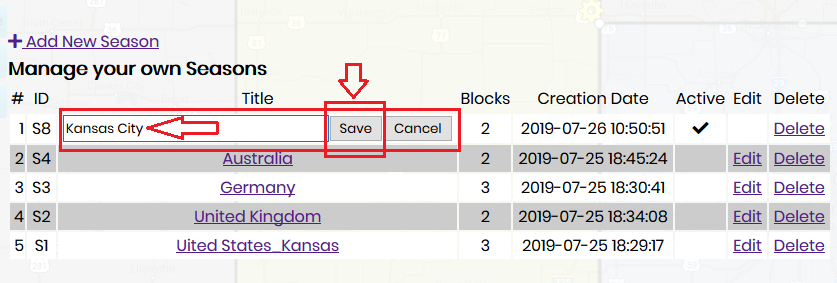
- We add a title for our current (S8) Season.
- If you are on Management section and you want to create a new Season definition pack (new row with a new Season ID) then you can click on “+Add New Season” link and new map will be ready for you to create a new Season. Please note, if you reload your web browser by clicking reload button, it will be ready for a new Season automatically. In this situation if you want to work on your previous Seasons then you have to click on Manage button and then click on Edit link located on your desire row and it will load your previous work.
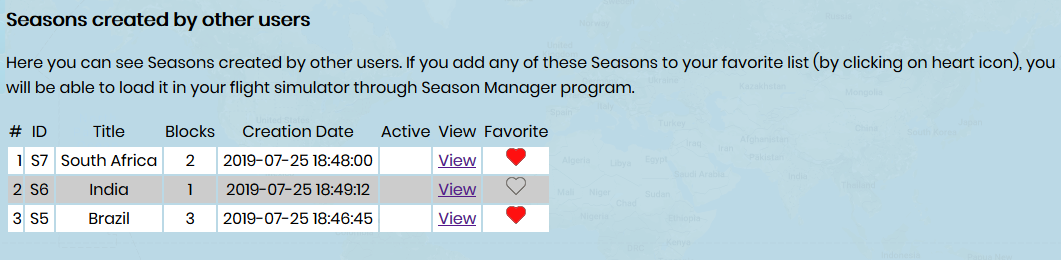
- With “Favorite” button you can see all Seasons created by other users.
Just like Manage section there are Title, Blocks, Active columns and there is a view column with “View” links which when you click on those links, you can see Season blocks on the map but because those Season blocks are not yours then you cannot edit them.
When you click on Favorite (heart) icon it will add/remove that Season to/from your favorite list.
Please note, only those Seasons will be available in your Season Manager program and you can add them to your flight simulator those are in your favorite list.
Manual flight simulator configurations
All necessary configurations will be done automatically when you run Season Manager program on your computer for the first time and login to your account and set your flight simulator address.
If you want your Season Manager works properly you have to consider these:
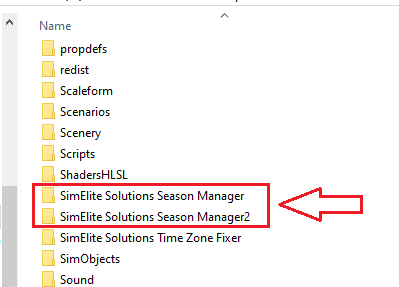
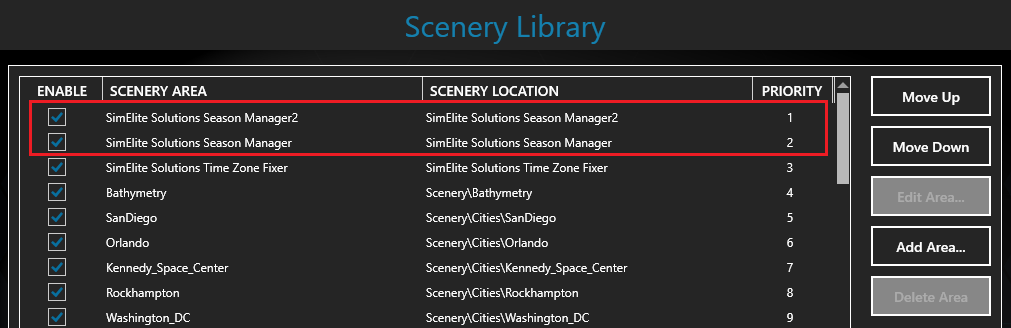
- Season Manager creates two entries in your flight simulator Scenery Library:
- SimElite Solutions Season Manager
- SimElite Solutions Season Manager2
- We recommend to keep those always on higher priority (at top) because if any season definition related addons placed above of these entries your Season won’t work correctly.
- ALWAYS SimElite Solutions Season Manager2 entry has to be located above (higher priority) SimElite Solutions Season Manager entry in your Scenery library. If you move #2 bellow other one, your Manual/Favorite Seasons won’t work correctly.
If for any reason you want to manually set all necessary configurations on your system you can follow these steps:
- Go to your flight simulator root folder
- Check if these two folders are there:
- SimElite Solutions Season Manager
- Scenery
- Texture
- SimElite Solutions Season Manager2
- Scenery
- Texture
- Run your flight simulator
- Go to Scenery Library
- Check if these two entries exist and enabled and they are at highest possible position (at the top):
- SimElite Solutions Season Manager2
- SimElite Solutions Season Manager
- Note that SimElite Solutions Season Manager2 has to be above SimElite Solutions Season Manager
- If for any reason above two entries are not in your Scenery library, you can add them manually by using “Add Area…” button and point it to your [flight simulator root]\SimElite Solutions Season Manager and [flight simulator root]\SimElite Solutions Season Manager2 folders.
- Now all configurations are done successfully and you can use your Season Manger program.